Loading…

How to Install Satellite Internet
By weirdtoo·January 12, 2026·10 min read
Clear, practical steps to choose equipment, mount and align a satellite dish, run cables, configure your router, and test speeds for reliable remote internet.
How to Install Satellite Internet
Satellite internet is a great option for areas where fiber or cellular connections aren't available. It connects directly to satellites, providing speeds up to 300 Mbps and latencies as low as 30–40 ms. To get started, you'll need a clear view of the sky, the right equipment, and proper installation. Here's a quick overview:
- Equipment: Most kits include a dish, cables, router, and power supply. Some providers, like Starlink, offer self-installation, while others may require professional help.
- Site Selection: Use the provider's app to find an obstruction-free location. Roof, pole, or wall mounts may be needed for better placement.
- Mounting: Secure the dish on a stable, level surface. Avoid manual adjustments for motorized models.
- Cabling: Use manufacturer-provided cables for durability and follow local codes for routing.
- Setup: Connect the dish to the router, power it on, and configure Wi-Fi through the app.
- Alignment: Some dishes auto-align, while others require manual adjustment using the app.
- Testing: Check speeds and signal strength via the app to ensure optimal performance.
With proper setup, satellite internet can deliver reliable connectivity, even in remote locations.
7-Step Satellite Internet Installation Process Guide
Starlink Satellite Internet: Installation demo and tips
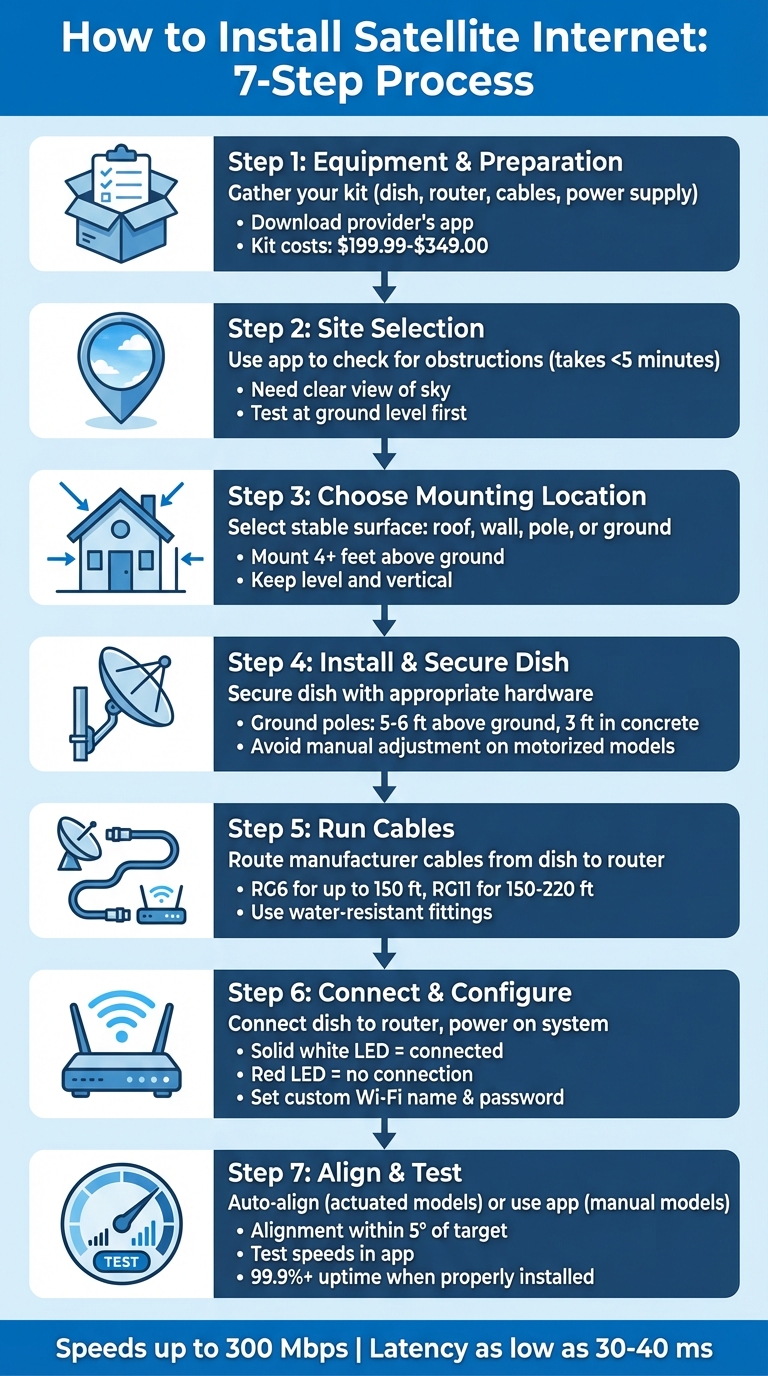
Equipment and Preparation
Before setting up your satellite dish, make sure you have all the necessary tools and equipment, and take the time to evaluate the installation site carefully.
Equipment Checklist
A typical satellite internet kit comes with everything you need to get connected. For example, the Starlink Standard Kit includes a satellite dish with an attached cable, a Gen 3 Wi-Fi router, a power supply unit, and a 4.92-foot AC power cable[5][4]. The setup requires a minimum of 75 watts to operate[5]. Pricing for these kits typically ranges from $199.99 to $349.00, with monthly service fees starting at $50.00[5][9].
While Starlink kits are designed for easy self-installation, providers like Viasat and HughesNet often require professional installation services[5]. If the included kickstand doesn't meet your needs, additional mounting hardware - such as pipe adapters, wall mounts, or pivot mounts - may be necessary[1][4]. It's also a good idea to download the provider's app on your smartphone to help with site selection and dish alignment[5][2].
Site Selection and Preparation
Choosing the right installation spot is crucial. Use your provider's app to check for an unobstructed view of the sky - this process takes less than five minutes but can save you hours of troubleshooting later[1][7]. Obstructions like tree branches, poles, or roof edges can disrupt your service and cause lag[3][8].
Start by testing the connection at ground level. If the app detects obstructions, you may need to mount the dish on a roof, wall, or pole to ensure a clear line of sight[1][3]. For the best performance, the dish should be installed as close to vertical as possible[3][8]. If you plan to use the service seasonally or might return the equipment during a trial period, keep the original packaging handy[5].
Provider and Equipment Compatibility
Once your equipment and site are ready, double-check that your modem and cable setup meet your provider's requirements. Satellite providers generally require their own modems, as standard cable or DSL modems aren’t compatible with satellite systems[9][12]. For example, Viasat and HughesNet use coaxial cables to connect the dish to the modem[10][11], while Starlink relies on proprietary cables and may require an Ethernet adapter if you’re using a third-party router[9][4].
Always use the cables provided by the manufacturer - they’re designed for outdoor use and offer protection against moisture[5]. If you’re working with a motorized dish, avoid manually adjusting it, as this could damage the internal motors[3][2].
Installing the Satellite Dish
Set up the dish and route the cables properly into your home.
Mounting the Dish
Once you've chosen the right spot for the dish, secure it with the appropriate mounting hardware. For ground installations, use the included kickstand. If the dish needs to be elevated due to obstructions, consider a wall mount, a pivot mount for slanted roofs, or a pipe adapter to reuse an existing pole[1][13].
Make sure the mounting surface or pole is stable and perfectly level. A plumb mast will make alignment much easier later on[16]. For ground poles, extend them 5–6 feet above the ground and embed at least 3 feet into concrete[16]. To keep the pole from spinning while making adjustments, drill a hole through the buried section and insert a bolt or spike as a "spin-stop"[16].
Position the dish at least 4 feet above the ground and keep it clear of power lines or other utilities[14]. For optimal performance, aim to install it as close to vertical as possible[3][8]. For Starlink Standard Actuated models, there's no need to adjust the tilt manually - these dishes automatically level themselves[15][3].
Running and Securing Cables
After mounting the dish, the next step is proper cable routing. Run the cable from the dish to the router, using the manufacturer's cable. For cable runs up to 150 feet, use RG6. If the distance is between 150 and 220 feet, switch to RG11[16].
Secure any exterior cables with a ground block, following local codes, and use water-resistant compression fittings where the cables enter your home[16][14]. Always power off the modem before connecting the coaxial cable[16].
sbb-itb-342b8b2
Connecting and Configuring Equipment
Once you’ve secured all the cables, it’s time to connect the hardware and configure your network settings.
Connecting the Modem and Router
The Starlink kit comes with its own router and pre-connected cables, making setup straightforward[1][4]. The Starlink cable connects directly from the dish to the router, eliminating the need for a separate modem. To get started, plug the dish cable into router port #1 (marked with the Starlink symbol). Make sure the cable’s locking mechanism faces up when connecting to the dish and down when plugging into the router, ensuring a snug fit[4]. Then, attach the AC cable to the power supply unit and connect it to the router[4]. The Gen 3 Starlink Kit includes a 49.2-foot (15-meter) Starlink cable and a 4.92-foot (1.5-meter) AC power cable, giving you flexibility in setup[4].
Powering and Positioning Equipment
After connecting the cables, place the router in a central location to maximize Wi-Fi coverage[1]. Ensure the router and power supply have enough airflow and aren’t confined to tight spaces. Once powered on, check the router’s LED indicator: a solid white light confirms you’re connected to the internet, while a red light signals no connection[4]. The white light will automatically turn off after an hour to reduce any distractions[4].
If the LED doesn’t light up, double-check that the power cable is securely connected to both the outlet and the router[4]. For homes with larger layouts or Wi-Fi dead zones, you can add a Gen 3 Mesh Router to extend the signal’s reach[1].
Setting Up Wi-Fi
When the system powers up, you’ll see the default "STARLINK" network appear on your devices[3][4]. Since this network isn’t password-protected by default, securing it should be your first step[3][4]. Open the Starlink App, navigate to Settings, select Router, and set a unique network name and a strong password[4][13].
"Installation was straightforward, it was literally, point the Kit to the sky, and within minutes we had speeds and reliability that felt almost indistinguishable from what we'd left behind." - Anthony W., Taunton, England[1]
Once connected, the system may automatically download software updates overnight to improve performance[7]. If you ever forget your custom Wi-Fi credentials, a factory reset will restore the default "STARLINK" network name and remove the password[13]. With the hardware in place and the network secured, your Starlink setup is ready to go.
Aligning and Testing the Satellite Dish
Adjusting Dish Alignment
Once your equipment is connected and the router is configured, getting the satellite dish properly aligned is a crucial step for top-notch performance. Depending on the type of dish you have, the alignment process can vary. Starlink Standard Actuated and Performance models handle alignment on their own. These motorized dishes automatically level and tilt to find the best angle for connection. It's important to note: never try to manually adjust these motorized units - doing so can damage the internal motors[2][3].
For non-actuated models like the Starlink Standard or Mini, alignment is a hands-on process. You'll need to use the Alignment Tool in the Starlink mobile app to manually position the dish[2][4]. Before you start, run the app's "Check for Obstructions" tool. This feature helps identify any potential blockages and guides you through the alignment process with real-time prompts[1][2][4]. The app provides a visual guide, showing exactly how to rotate or tilt the dish. When the dish is within 5° of the target position, the app will confirm proper alignment[4].
"Alignment in the app makes it really easy to get right in real time." - Davis S., Wellington, New Zealand[1]
Once powered on, give the dish a few minutes to determine its optimal angle based on your location in the hemisphere[3][8]. Keep an eye on the router's LED light for connection status. If the light remains red for more than 20 minutes, double-check your cable connections and realign the dish if necessary[4].
After ensuring the dish is correctly aligned, you can move on to testing your connection speed.
Testing Connection Speed
With the dish aligned, it's time to check your connection speed. The Starlink app provides real-time feedback on both signal strength and speed[3][4]. It will also alert you if the dish shifts more than 5° from its ideal position[4]. When everything is set up correctly, a Starlink system typically delivers stable speeds and reliable connectivity, supported by an impressive uptime of over 99.9%[1]. A solid white light on the router indicates that you're good to go.
Final Tips and Next Steps
Your satellite internet is now active, but keeping it running smoothly requires a bit of upkeep. Here are some habits to help maintain its performance. Your equipment automatically downloads software updates, usually during the night, so it's a good idea to leave the system powered on to ensure it stays updated[7][2]. Every so often, use the "Check for Obstructions" tool in your provider's app to make sure nothing - like growing trees or new buildings - has started blocking the dish's view of the sky[1][7]. These simple checks can go a long way in keeping your connection strong.
If you're currently using a temporary ground-level setup, think about upgrading to a permanent mount on your roof, a pole, or a wall. This not only protects the dish from accidental damage but also provides better stability over time[1]. Be cautious with actuated models - manual adjustments can cause damage, so it's best to leave those alone.
Keep an eye on your router's LED indicator: a solid white light means your connection is good, while a red light usually signals a problem, like an obstruction or a loose cable[4]. If issues arise, your mobile app can provide helpful alerts such as "Offline - Disconnected" or "Offline - Searching", making it easier to identify the cause[7][2].
For persistent issues that simple troubleshooting can't fix, it's worth contacting Authorized Installers who have specialized training in satellite equipment[6][1]. And if you're in an area with limited connectivity options, providers like WEIRDTOO (https://weirdtoocompany.com) are dedicated to offering affordable internet access to underserved communities, including trailer parks and rural neighborhoods.
With regular care and attention, your satellite internet can deliver high-speed connectivity with uptime exceeding 99.9%[1].
FAQs
What should I do if my satellite dish gets misaligned after strong winds?
If strong winds have thrown your satellite dish out of alignment, don’t worry - it’s something you can fix with a few straightforward steps. Start by using your satellite provider’s app to check the dish’s alignment. The app will guide you with on-screen instructions to see if the dish is set at the correct angle. For manual setups, carefully adjust the dish until it’s properly aligned. If you have an auto-leveling model, let it do its thing - it will realign itself once it stabilizes.
Next, inspect the mounting hardware. Tighten any loose bolts, screws, or locks to ensure the dish is securely fastened. Make sure the brackets are firmly anchored, and clear away any obstructions, like overhanging branches or debris, that might block the dish’s line of sight. Once everything is secure, monitor the connection for a few minutes to ensure it’s stable. If the alignment keeps getting disrupted, it might be time to upgrade to a sturdier mount or add wind-resistant features to keep things steady in the future.
How can I fix Wi-Fi dead zones in my home?
To boost your Wi-Fi coverage and get rid of those frustrating dead zones, start by positioning your router in a central, elevated spot. Keep it away from walls, metal objects, and appliances that could interfere with the signal. If you’re dealing with a larger home, a mesh system with extra nodes can help extend coverage to tricky areas like basements or far-off rooms.
Reduce physical barriers like thick walls or bulky furniture that might block the signal. If needed, place a mesh node on the other side of these obstacles to bridge the gap. Most modern routers come with apps or built-in tools to check signal strength and pinpoint weak spots, making it easier to fine-tune your setup. Once everything's in place, secure your network with a unique name and a strong password to keep unwanted users out.
For areas with limited connectivity, WEIRDTOO offers budget-friendly Wi-Fi solutions specifically designed for rural communities. Their packages include mesh hardware and round-the-clock support, so you can enjoy reliable coverage without having to invest in extra equipment.
What can affect the performance of satellite internet?
Satellite internet performance can hinge on a few critical factors. One of the main culprits? Obstructions. Things like trees, buildings, or even parts of your roof can block the dish's line of sight to the sky. Since satellite internet depends on a clear connection to orbiting satellites, any interference can lead to slower speeds or interruptions.
Another frequent issue is dish positioning or alignment. For the best signal, the dish needs to be installed at the right angle and allowed to auto-level. Manually tweaking it might disrupt its ability to lock onto the strongest signal. Many satellite providers offer tools, like an obstruction checker in their apps, to help you find the ideal placement for your dish.
Making sure the dish has a clear view of the sky and is properly aligned can go a long way in preventing connection hiccups and keeping your internet running smoothly.
Current contact path
Need Weird Network WiFi, custom apparel, or scoped help?
Use the contact form; removed product, checkout, research, and newsletter funnels stay offline.